Advanced Settings
The Advanced Settings function allows you to update the firmware and conveniently adjust many settings of the EZCast Pro Dongle II via remote access.
Open Advanced Settings
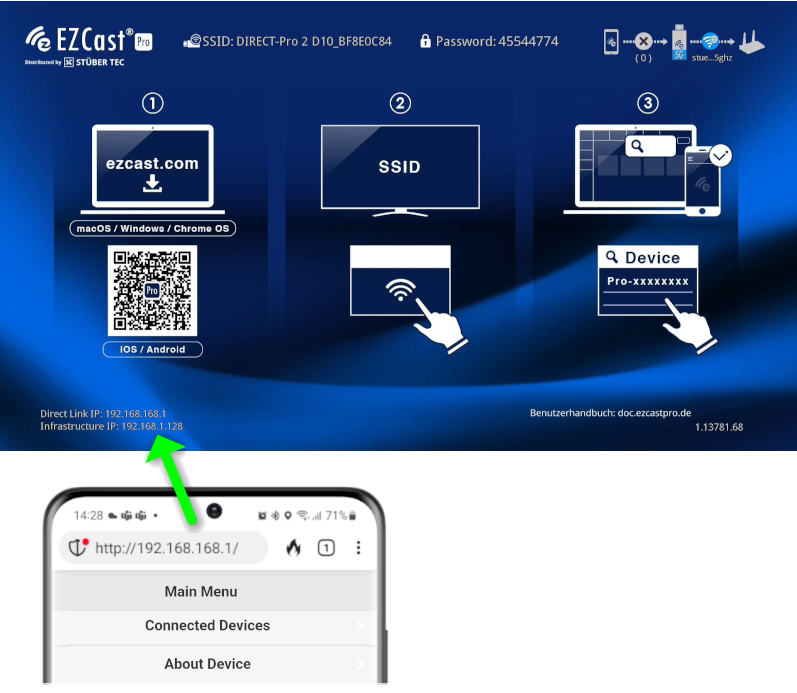
- Connect your device to the EZCast Pro II device, either via the EZCast Pro II device's SSID or through the same Wi-Fi/LAN infrastructure the EZCast Pro II device is connected to:

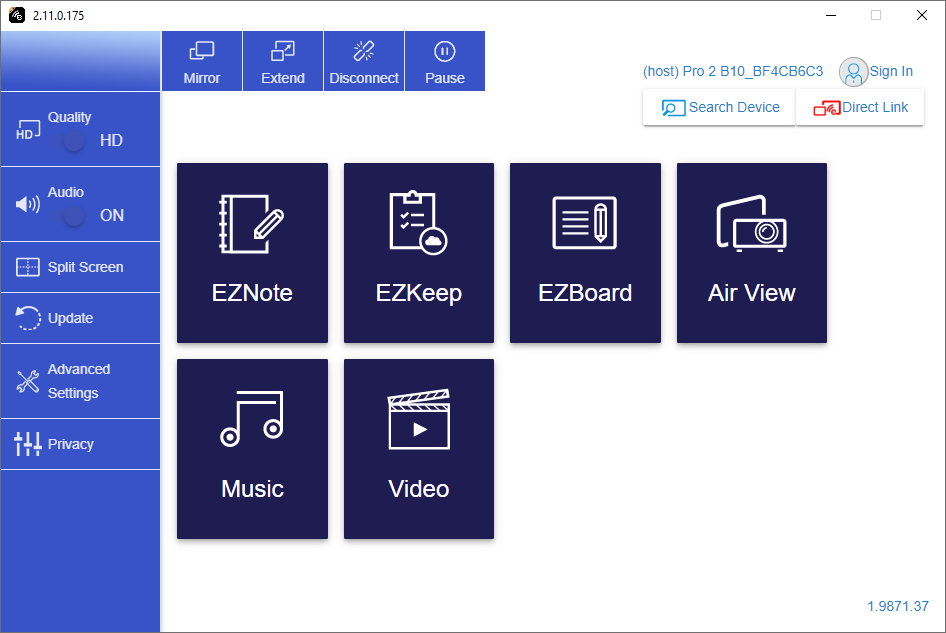
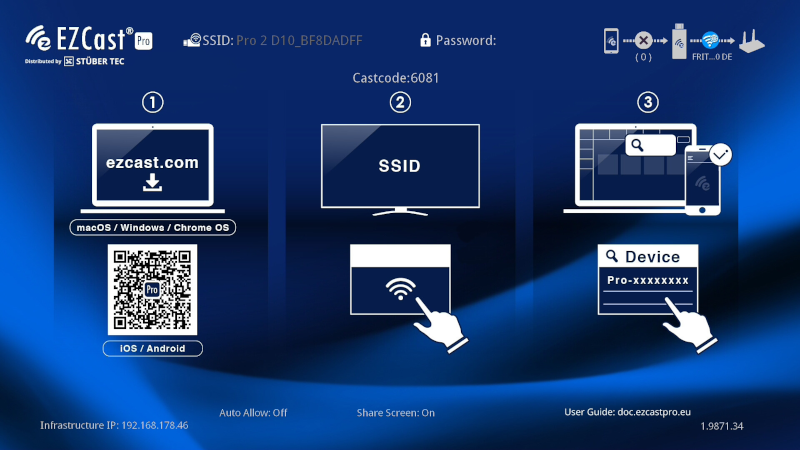
- Enter the IP address of your EZCast Pro device in any web browser, which is displayed at the bottom left of the homepage:
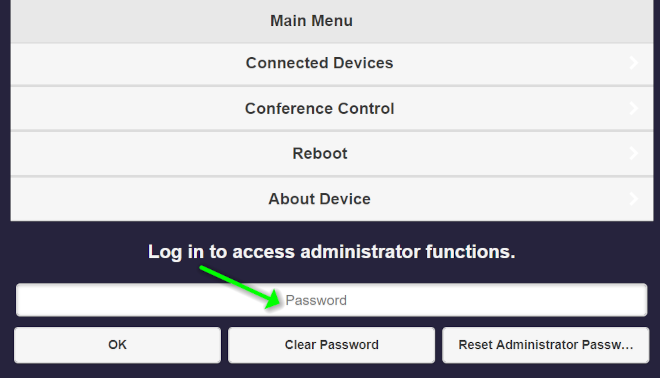
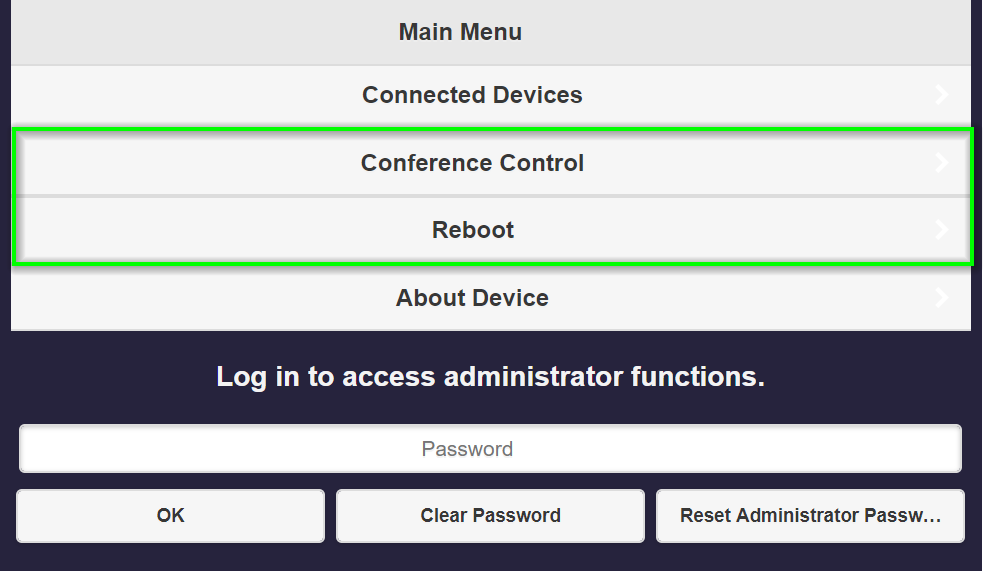
Log in as Admin
- Enter the admin password and click
OKto log in. By default, the password is000000. If this password is not accepted, reset the device using the reset button.
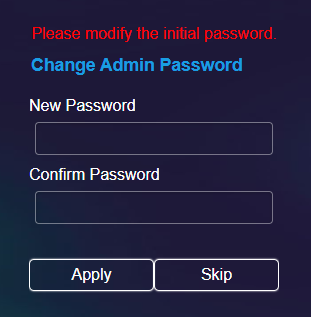
- During the first login, you must change the admin password. Afterward, you will need to log in again.
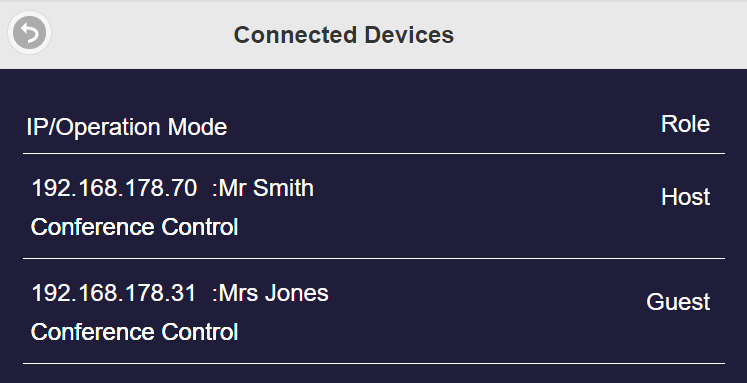
Connected Devices
Displays connected users and their assigned roles as either Host or Guest. For more information about Host and Guest roles, see here.
Conference Control
With Conference Control, you can perform the following tasks:
- Disconnect all devices
- Assign the Host or Moderator role to a guest
- Reposition devices on the screen
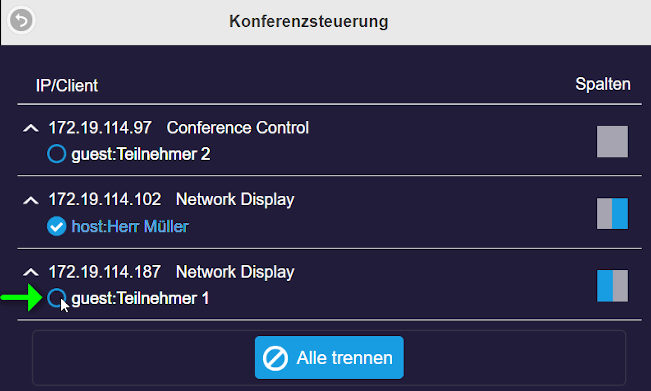
For a comprehensive guide on this topic, see here.
Device Management
This section helps you adjust settings such as the language of the user interface, resolution, or specifying Max. Connections.
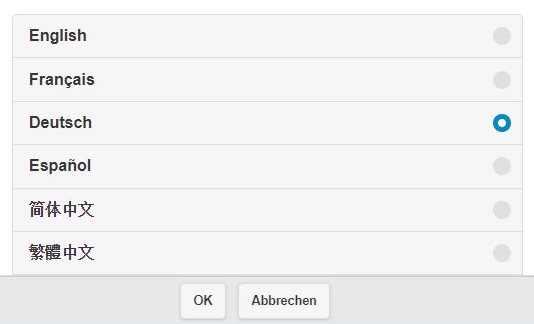
Language
Under Language, select the desired display language for the Advanced Settings menu.
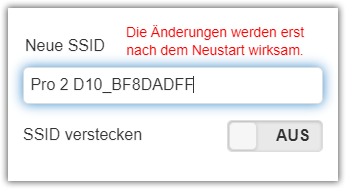
Device Name / SSID Name
Change or hide the device name/SSID here:
The EZCast Pro Dongle II has three network interfaces. Disabling the SSID (wlan1) makes the dongle only reachable via a router or Miracast (P2P).
| wlan | Remark |
|---|---|
| wlan0 | Router / AccessPoint |
| wlan1 | SoftAP (Direct Connection) SSID/HotSpot |
| wlan2 | P2P, MiraCast |
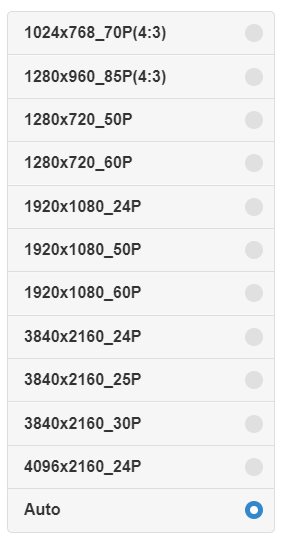
Resolution
Here, you select the output resolution of the EZCast Pro Dongle II. You can either choose a specific resolution or select Auto, and the Pro Dongle II will automatically set the optimal resolution for your screen.
| Standard | Resolution | Hz |
|---|---|---|
| HD | 1280 × 720 | 60 |
| Full-HD | 1920 × 1080 | 60 |
| 4K UHD | 3840 × 2160 | 30 |
| DCI 4K | 4096 × 2160 | 24 |
The following resolutions can be set:
Display Mode
Here, you define whether the display of your device on the external screen or projector should be shown in Original or Full Screen mode.
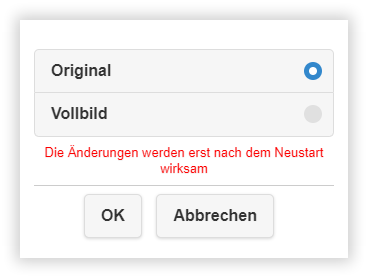
Original
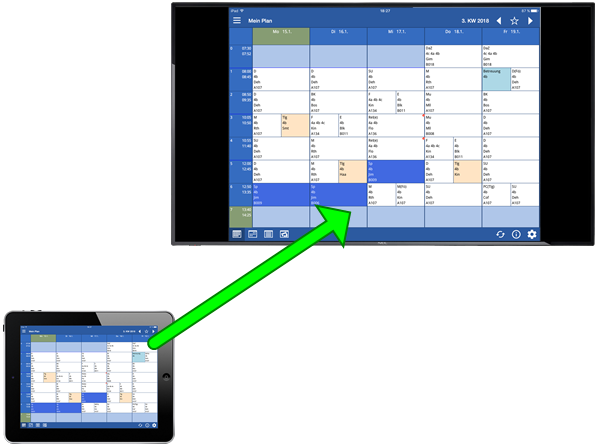
In Original mode, the native aspect ratio of the device (e.g., an iPad) is displayed on the external screen or projector:
Full Screen
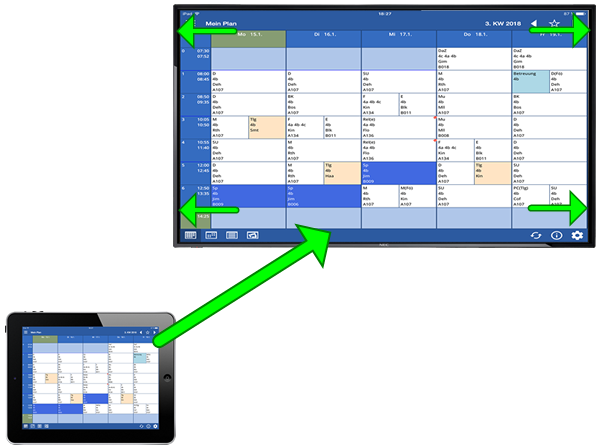
In Full Screen mode, the input from the device is automatically adjusted to match the aspect ratio of the external screen or projector:
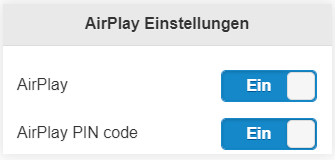
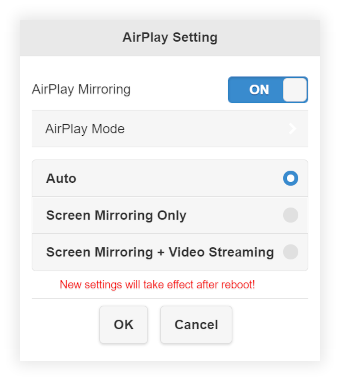
AirPlay Mode
By default, the AirPlay protocol is enabled on EZCast Pro II devices. If you wish to disable or re-enable this function, select the desired option. For a comprehensive guide on using AirPlay, see here:
Select the mode for video playback:
Auto- Automatic modeScreen Mirroring Only- Screen and video content are mirroredMirroring + Video Streaming- Screen is mirrored, and online videos (e.g., YouTube) are streamed
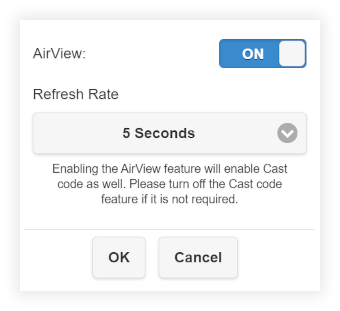
AirView
Enable or disable AirView. For a comprehensive guide on using AirView, see here.
EZNote
Enable or disable EZNote.

Cast Code Control
Define whether guests must enter a four-digit code to share content.
OFF- No passcode requiredRandom- Random (automatically regenerates when powered on or restarted)Fixed- Specify a fixed cast code
The cast code is displayed here:
For a comprehensive guide on using Cast Code, see here.
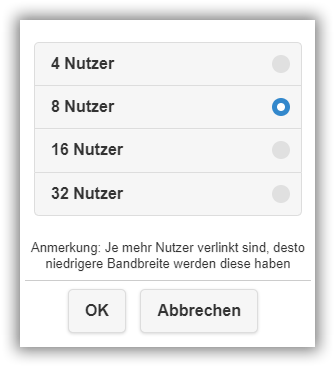
Max. Connections
This setting determines the maximum number of direct connections the EZCast Pro Dongle II can support. Additionally, 32 connections via a router are supported.
Please note: The higher the number of connected users, the lower the bandwidth available for each user.
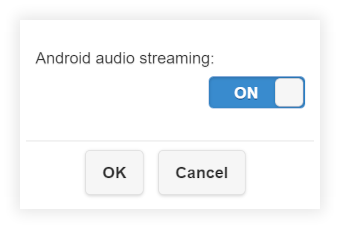
Android Audio Streaming
When enabled, you can stream audio from a Bluetooth-compatible device (including Android, Windows, Apple). This function works independently of screen mirroring protocols and can be used to play music. Note: This function cannot be protected with a security code or password.
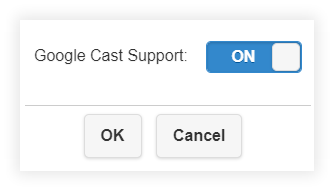
Google Cast
Enable screen mirroring from devices via the Google Cast protocol. For a comprehensive guide on using Google Cast, see here.
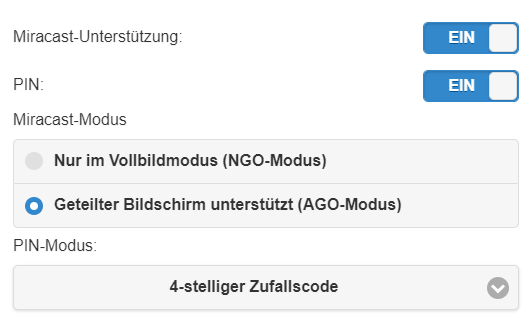
Miracast
Enable support for Miracast devices. For a comprehensive guide on using Miracast, see here.
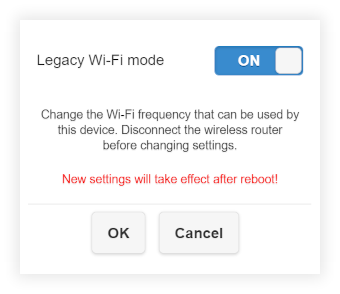
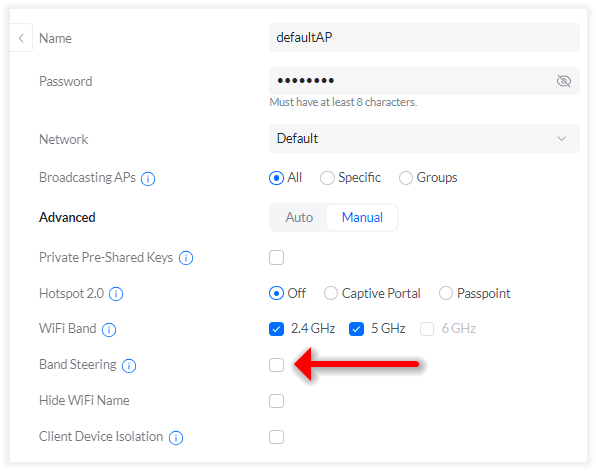
Legacy Mode (2.4 GHz Wi-Fi)
If you want the EZCast device to connect via a 2.4 GHz Wi-Fi frequency, enable Legacy Mode. To support dual-band 2.⅘ GHz Wi-Fi, please disable the Band Steering function within the corresponding SSID of your access points. This will ignore the 5 GHz frequency. For full documentation on Wi-Fi requirements, see here.
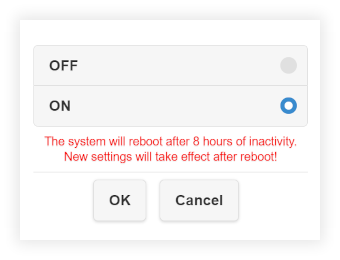
Timed Restart
To optimize the performance of the EZCast Pro device, especially for devices running continuously, enable the Timed Restart function. The receiver will automatically restart under the following conditions:
- The EZCast Pro Dongle II has been inactive for 2/4/8 hours.
- No user has been connected for at least 2/4/8 hours.
- The web interface settings have not been used for 2/4/8 hours.
Network Management
In this section, you can adjust settings for the internet, IP settings, and Wi-Fi channel.
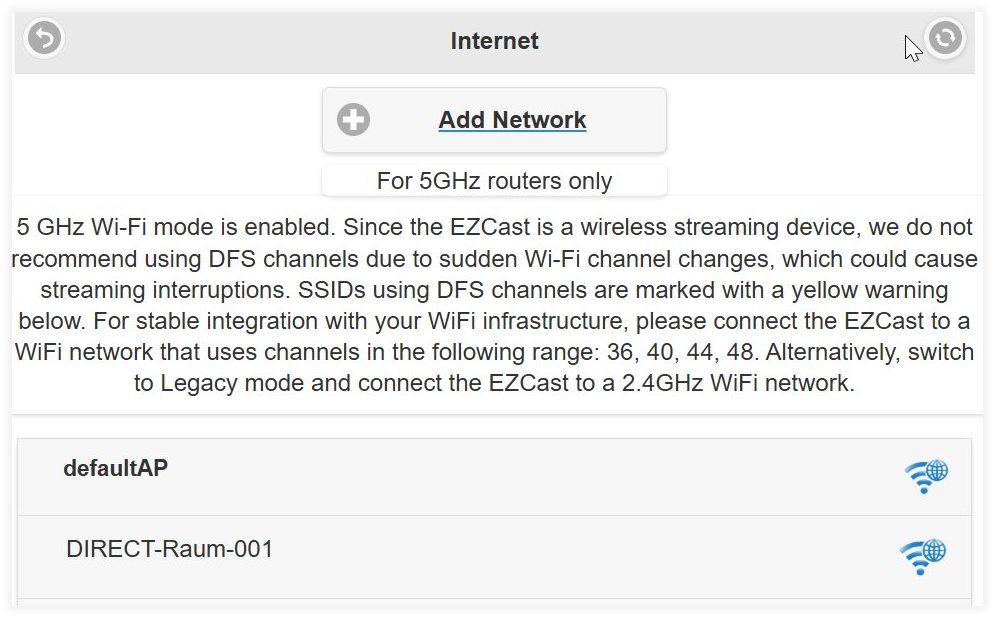
Connect to 5 GHz Wi-Fi Router/AP
Connect the Pro Dongle to your Wi-Fi router.
Note: The EZCast Pro Dongle II can only connect to a 5 GHz Wi-Fi router unless you have enabled Legacy Mode (2.4 GHz Wi-Fi).
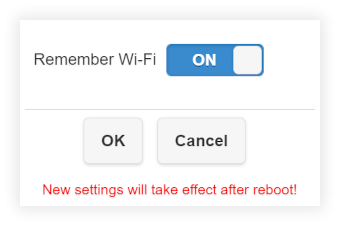
Remember Wi-Fi
If the connection between the EZCast Pro Dongle II and the internet/router should be permanently saved, this option must be enabled. Otherwise, the connection will not be automatically restored after a restart.
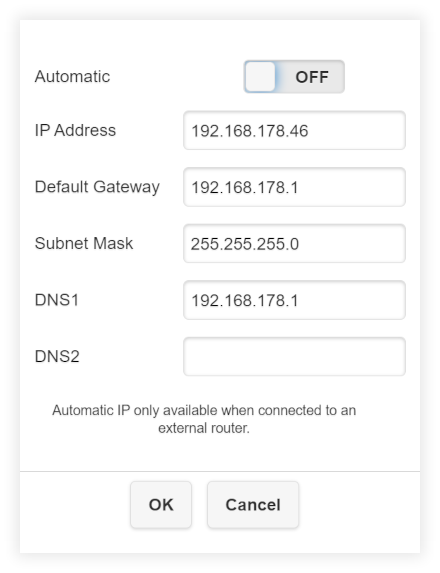
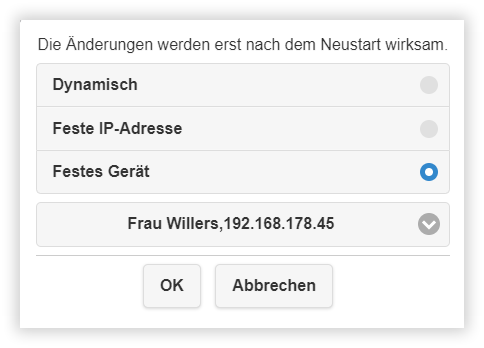
Wi-Fi IP Settings
Assign a static IP address to the Pro Dongle II or enable automatic IP addressing (DHCP).
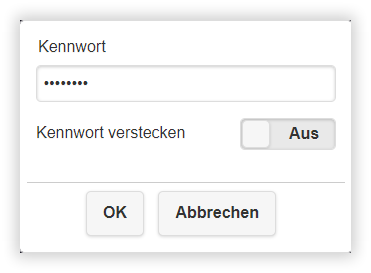
Change Wi-Fi Password or Hide It
Set a custom password for the Pro Dongle's Wi-Fi and choose whether to hide the password for security reasons.
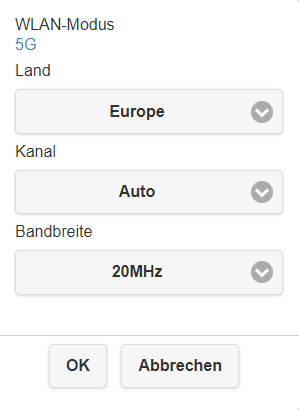
Wi-Fi Channel
To avoid interfering Wi-Fi signals, you can adjust the Wi-Fi mode.
Admin Settings
In this section, you can update the EZCast Pro II receiver to the latest firmware, reset to default settings, and configure many other advanced settings.
Admin Password
Change the admin password of the receiver.
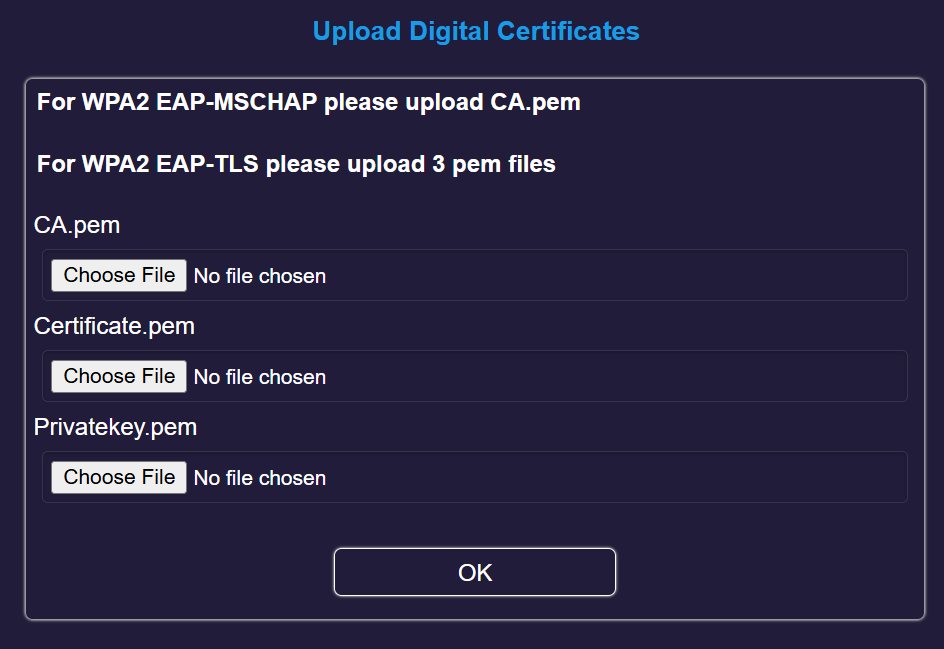
Wi-Fi Enterprise
Upload a digital certificate.
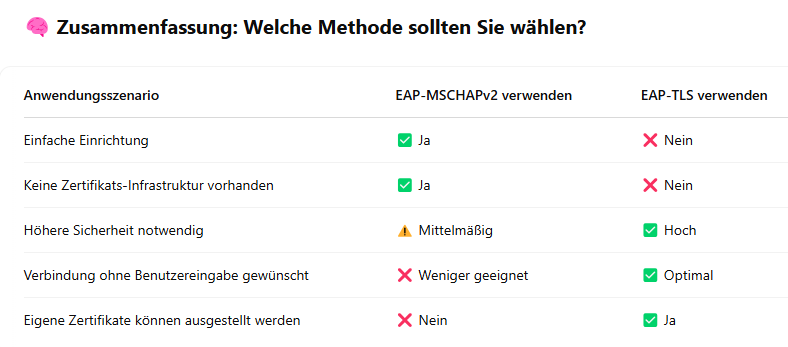
Which method should you choose?
| Application Scenario | Use EAP-MSCHAPv2 | Use EAP-TLS |
|---|---|---|
| Simple setup | ✅ Yes | ❌ No |
| No certificate infrastructure available | ✅ Yes | ❌ No |
| Higher security required | ⚠️ Moderate | ✅ High |
| Connection without user input desired | ❌ Less suitable | ✅ Optimal |
| Own certificates can be issued | ❌ No | ✅ Yes |
WPA2 EAP-MSCHAPv2 (also known as PEAP-MSCHAPv2)
- ✅ Upload: Only the file
CA.pem - ❌ No client certificate or private key required
- 🔑 Authentication: Via username and password
- 🔐 Purpose of
CA.pem:
It is used to verify the certificate of the RADIUS server, so the device only accepts trusted servers.
✳️ In the EZCast menu, you must also enter a username and password.
TheCA.pemfile only protects you from accidentally connecting to a fake server.
WPA2 EAP-TLS (Certificate-based Authentication)
- ✅ Three files are required:
CA.pem– Trusts the server certificateCertificate.pem– Identifies the device-
Privatekey.pem– The corresponding private key for the certificate -
❌ No username or password required
-
🔐 Authentication: Is performed through mutual verification of certificates
-
✳️ All three files must match:
The client certificate (Certificate.pem) must be signed by the CA (CA.pem),
and the private key (Privatekey.pem) must belong to the certificate.
Host Permissions
Control which functions the Host can perform in the Advanced Settings menu without logging in as Admin.
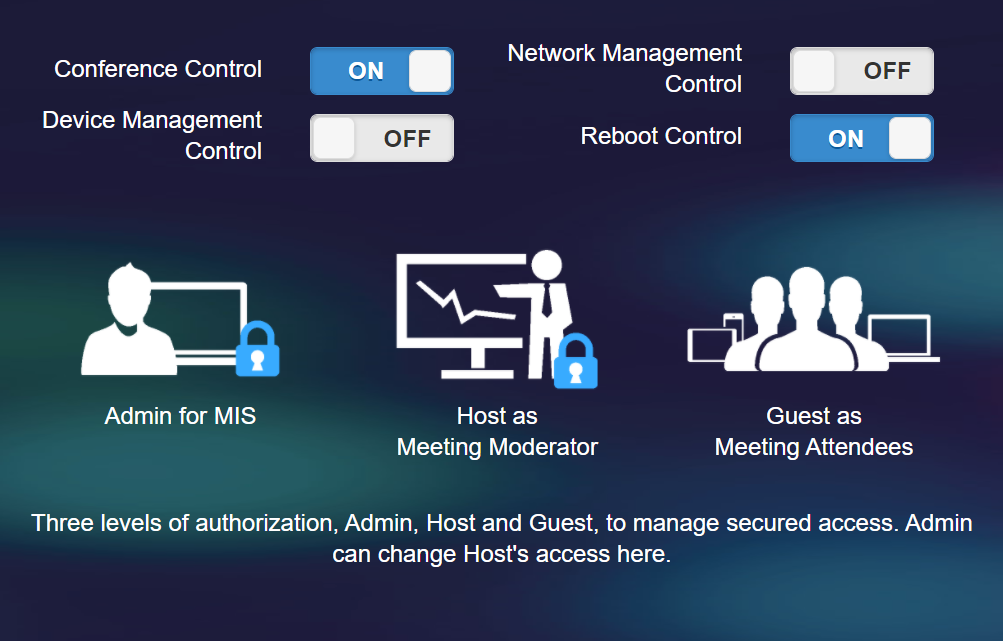
For example, if you want to prevent the Host from accessing the Settings button in the software/app, you can set the Device Management option to Off.
With the above configuration (disabling Device Manager Control and Network Setup Control), only the Conference Control and Restart functions are displayed. Note: The Connected Devices and About the Device sections are always available.
Host Control
The first user to connect via the software/app is designated as the Moderator (Host), while others are Guests. By default, every request to share must be approved by the Host, who responds with either Allow or Deny:
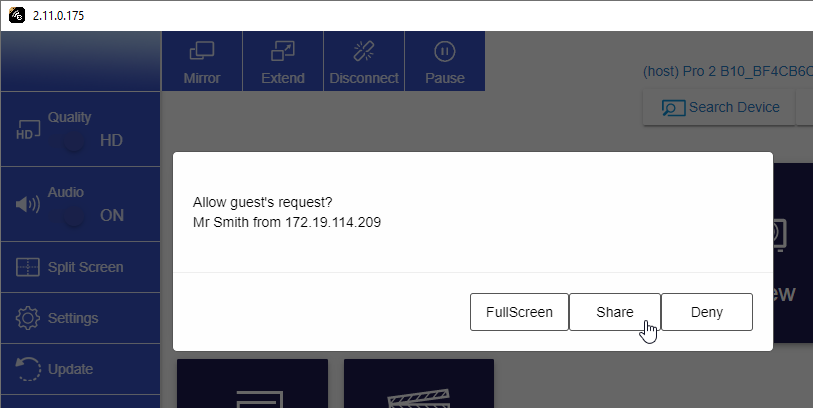
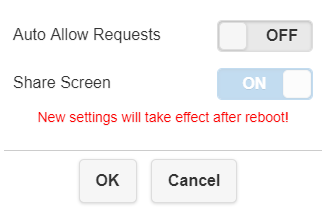
Automatically Approve Requests
If Automatically Approve Requests is set to On, sharing requests are approved automatically.
Screen Sharing
By default, this function is enabled, allowing up to four devices to share the screen simultaneously (Split-Screen mode). If Screen Sharing is turned off, the next approved sender takes over in Full Screen mode.
The status of Host Control settings is displayed at the bottom of the homepage:
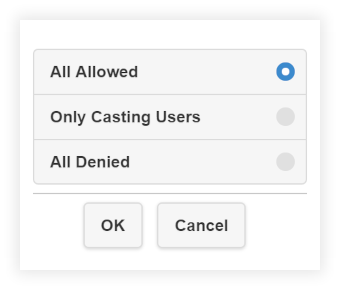
Internet Access Control
Control whether connected devices can access the internet via the EZCast Pro II receiver. By default, all devices are allowed:
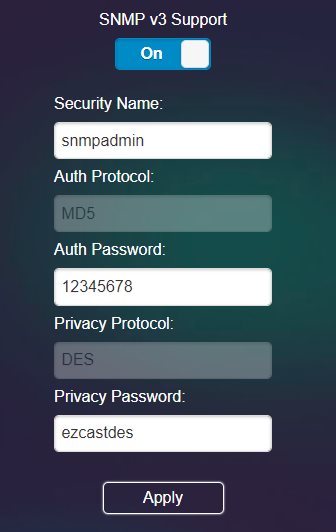
SNMP
Enable SNMP V3 support.
My Screen
If desired, you can replace landing page image. This is a permanent change. After uploading a new image, the previous image cannot be restored, even after resetting the device.
Download our default landing page image here.

Dynamic Wallpaper
Dynamic Wallpaper is a feature that automatically starts after a configurable period of inactivity, displaying a collection of images or videos on the screen.
For a comprehensive guide on using Dynamic Wallpaper, see here.
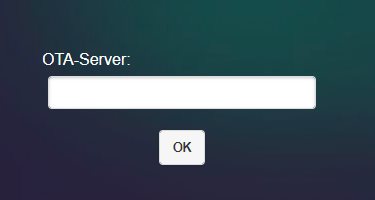
OTA Update URL
Specify an OTA server.
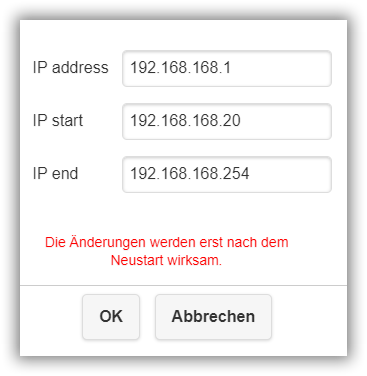
CustomSoftAP
Specify an IP address range for the EZCast Pro device's hotspot:
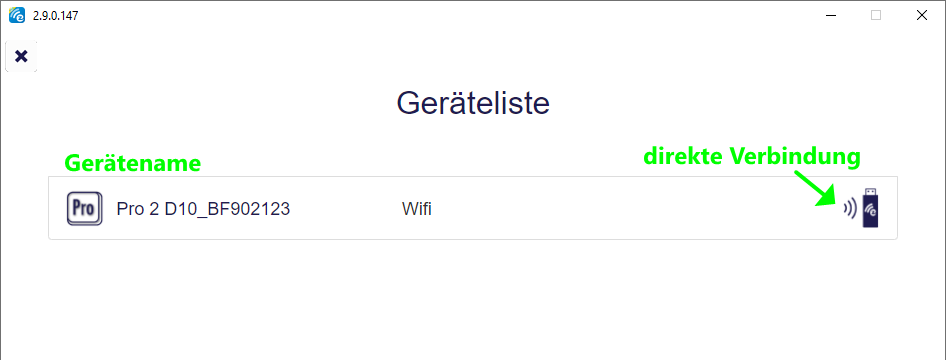
Connection (Network Interfaces)
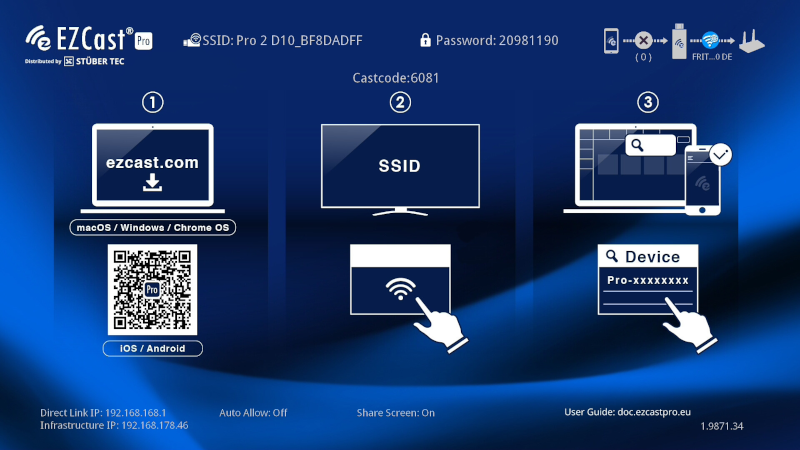
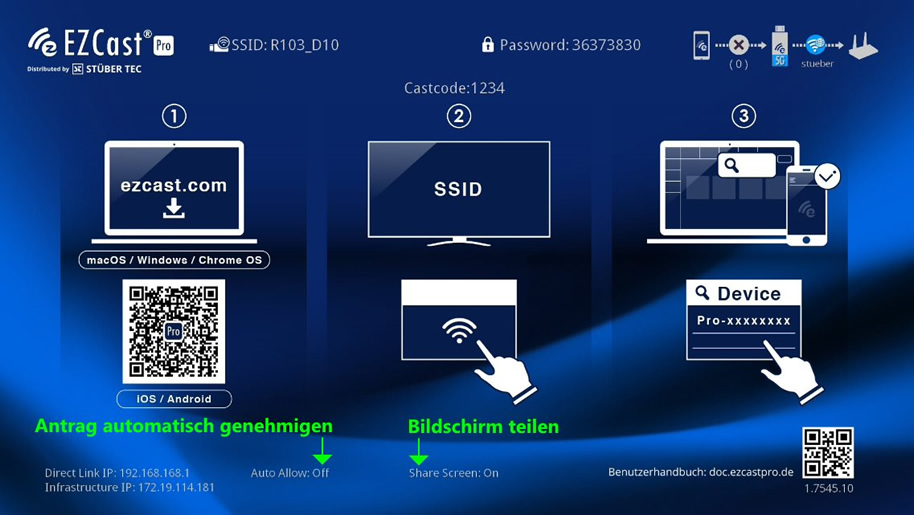
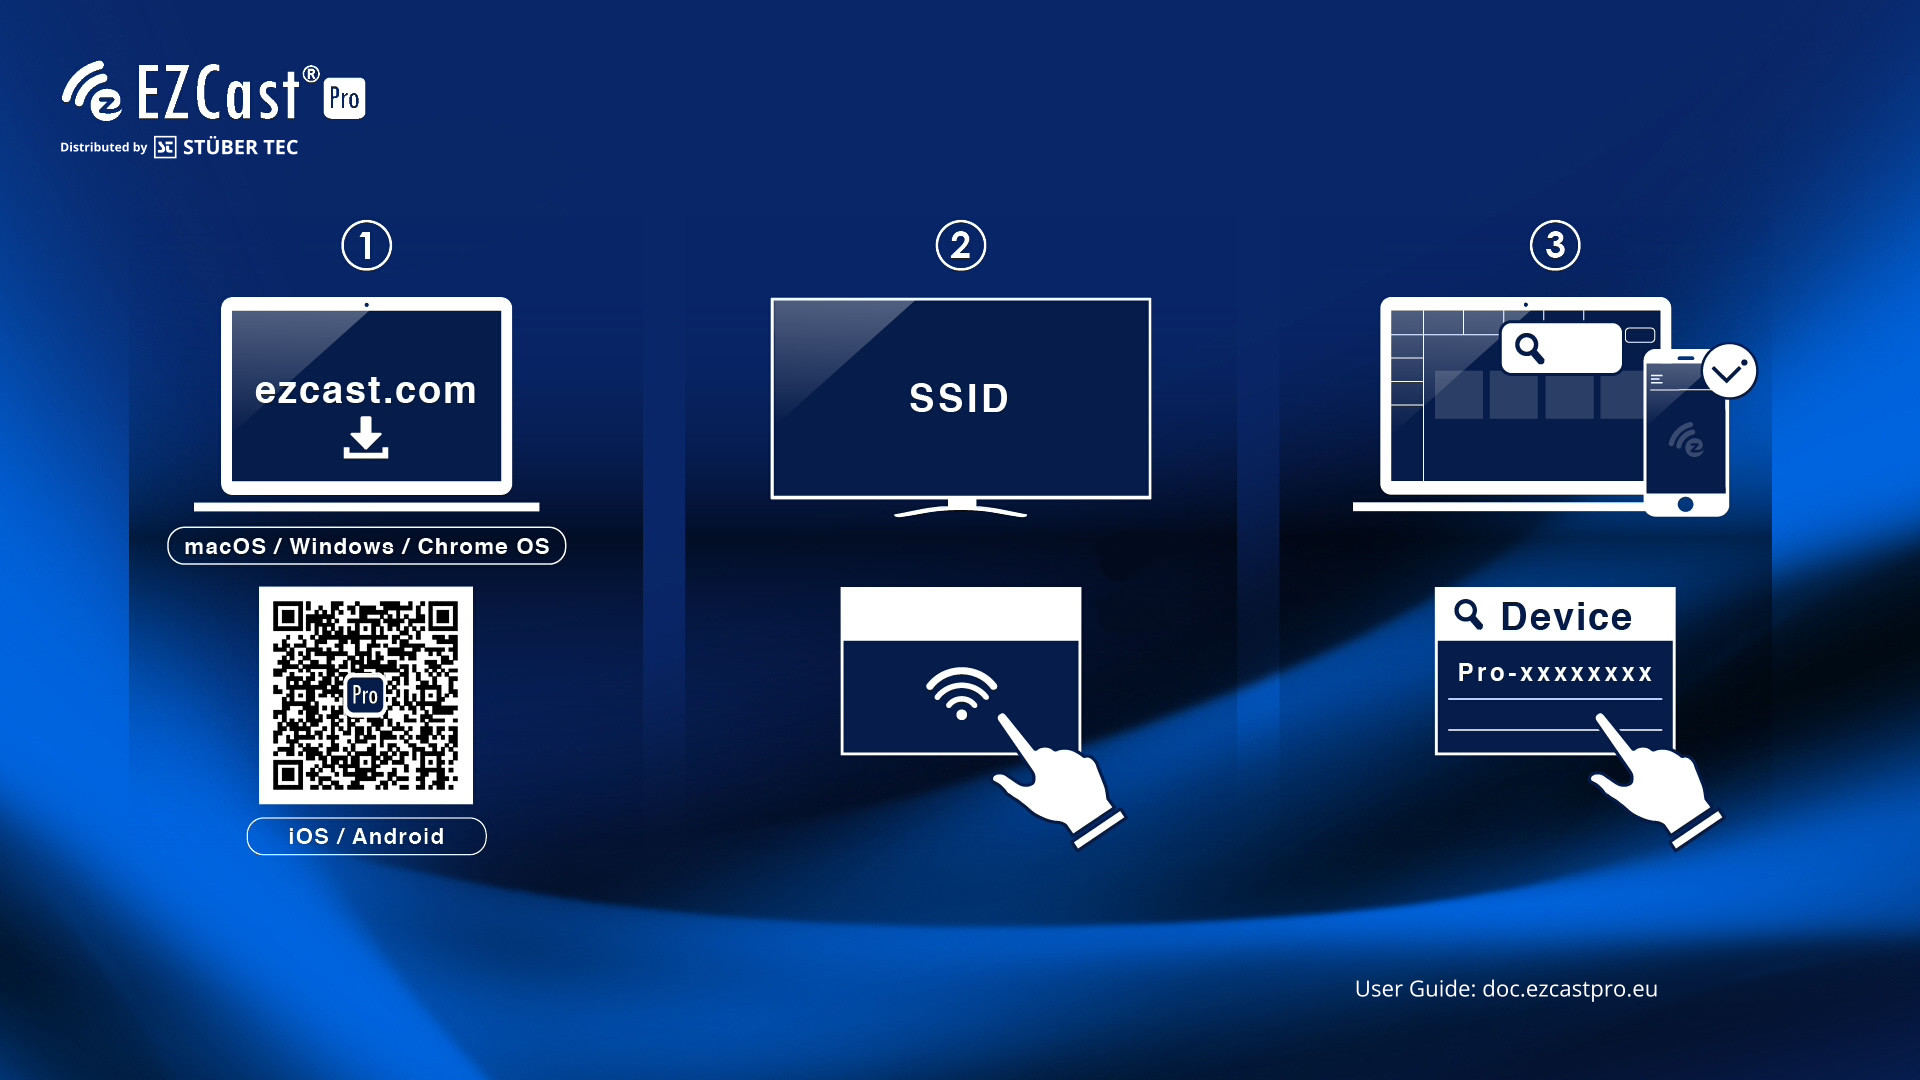
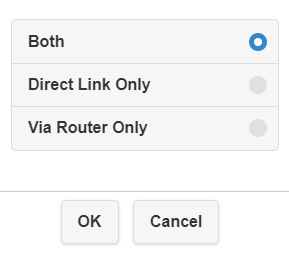
There are two ways to connect to the receiver. During initial setup, the EZCast Pro device provides Direct Connection and Via Router by default.
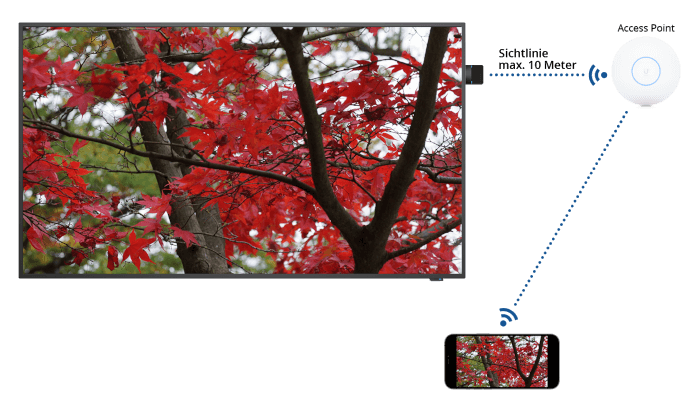
Direct Connection
Connect your device (e.g., an iPad) to the EZCast Pro device's hotspot via the displayed SSID. Internet content is then relayed from your Wi-Fi to your device. This provides the best bandwidth between your device and the EZCast Pro device if the distance to the access point is large. For Direct Connection, the user must switch from their current network to the EZCast Pro device's SSID.

The SSID and password for Direct Connection are displayed at the top of the homepage:

Via Router
The EZCast Pro device is connected to the Wi-Fi by the administrator. Internet content is relayed from your network infrastructure to your device. Next, connect your device (e.g., an iPad) to the EZCast Pro device. With this interface, the user does not need to switch networks.

By default, both network interfaces are enabled with the Via Router or Direct Connection setting. However, you can disable one by switching to either Direct Connection Only or Via Router Only:
With the first two options (Via Router or Direct Connection and Direct Connection Only), the SSID and password are displayed on the homepage, as shown below:
With Via Router Only, the EZCast Pro device's hotspot is disabled, and you can only connect via your access point or infrastructure. The SSID and password are grayed out, and the IP address assigned by the infrastructure is displayed on the homepage:
Caution
Enabling Direct Connection Only or Via Router Only will prevent connections via the other mode. If you enable Direct Connection Only along with Hide SSID or Hide Password, do not forget the login details, or you will need to perform a hard reset!
Fixed Host
Designate a specific user as the permanent Host for presentations in the software/app. For more information, see here.
Upgrade (Firmware)
Update the firmware of the EZCast Pro Dongle II to access the latest features and improvements.

Click here for a complete guide on firmware updates.
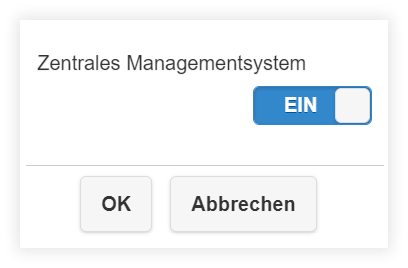
Central Management System
Enable support for the Central Management System (CMS) here:
Reset to Default Settings
Use this option to restore the Pro Dongle to factory defaults. For more information, see here.
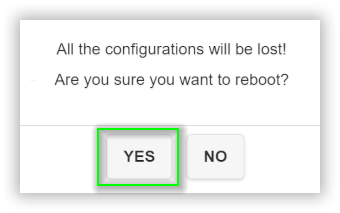
Restart
Use this option to restart the Pro Dongle.

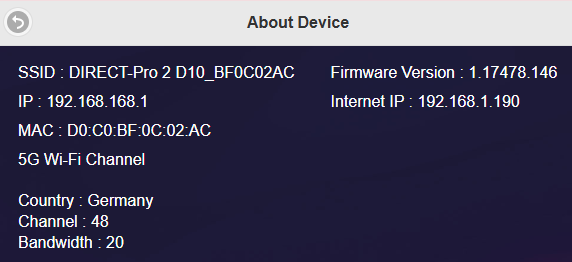
About Device
Use this option to view an overview of the Pro Dongle, including firmware version, IP address, and Wi-Fi details.